AWS Web Application Common Practices
An architecture of AWS services to serve a web application according to the latest best practices.
I’m going to build up a simple web application starting with as simple as code, and grow this until it becomes complicated with the latest best practices application.
0. Initial Parts
The first few things that must be done are to prepare your backend, FE, and your database structure to run locally at least. for the purpose of this exercise, we’re going to assume that your web application is using the LEMP stack. meaning:
- Linux
- Nginx
- MySQL
- PHP
1. A Hosting Server
Now that you have all of your needs in a place locally, we need to put it in the cloud in a place that is accessible by people.
So we start by buying an EC2 instance which is basically a server that can serve an OS chosen by you while setting it up, with the size you chose according to your traffic. Let’s assume medium traffic and Linux OS.

Of course while setting it up make sure you’ve enabled the public ip check so that your machine is accessible from outside, and then install the LEMP stack so it serves your web application.
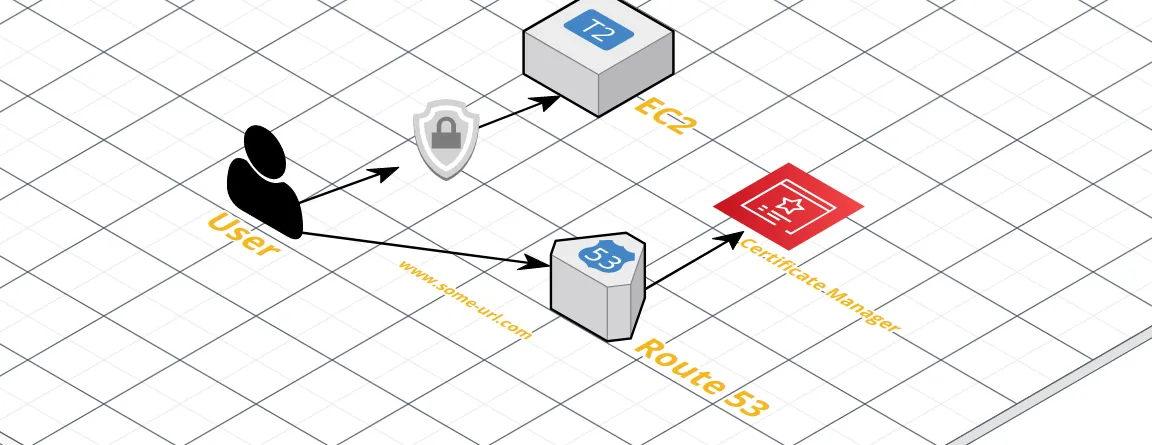
2. DNS Registration
After doing #1, you have a public server that can serve your application, but the problem is that people need to access it using a proper URL so we need to register the domain and make it accessible by Google it puts it in its search engine. For that, we’re going to use Route53 ( you can host using external services but since we’re using AWS lets just use that )

3. Certificate Manager (HTTPS)
Now that people can access your website they need to make sure that it’s secure or at least labeled as secure (HTTPS green stamp). To do that we’re going to use the Certificate Manager.
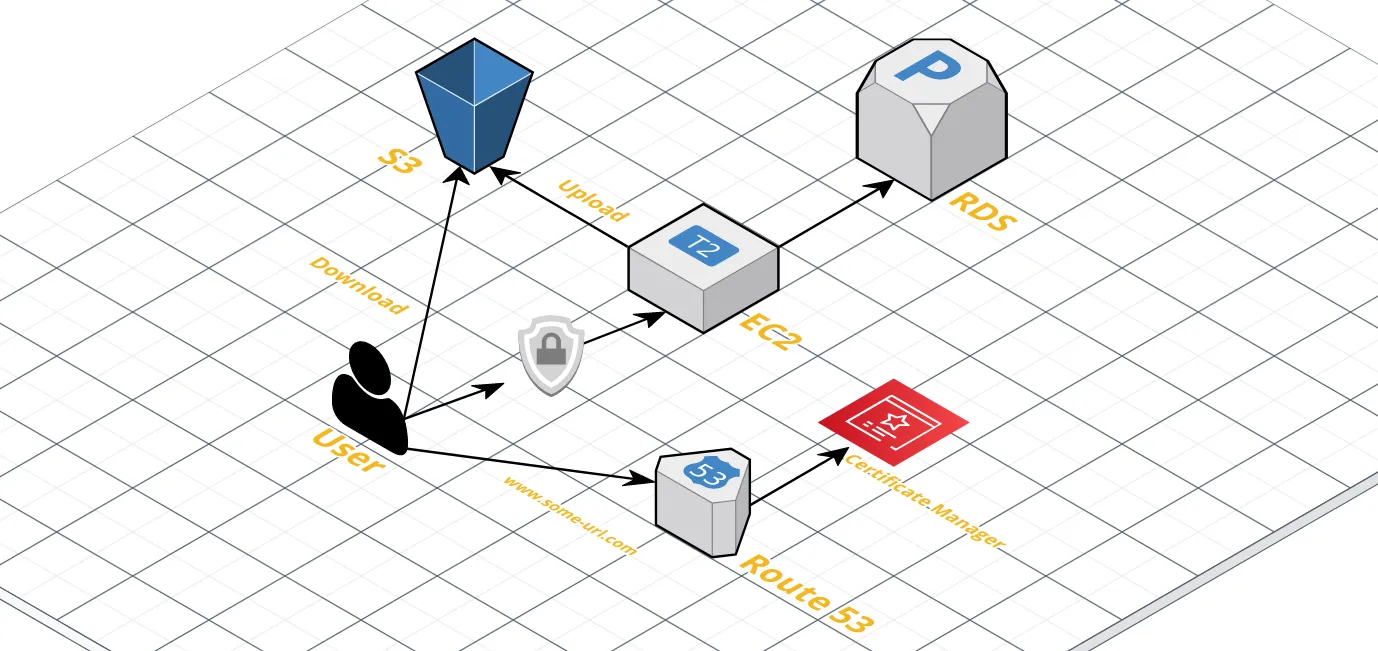
4. RDS (DataBase)
Now that our application is normal (or way less than normal), it’s time to improve it. Our DB is inside the EC2 instance meaning that if the server by any chance falls down because of heavy traffic, some Linux fail, or some other reason you might lose all of your data. so separation is the key here. What we need to do is to set up an RDS service that will contain our MySQL structure separate from the EC2 and connect to it from the EC2 instance.

5. S3 ( Storage )
Now, your website will probably have some kind of uploading mechanism whether it’s a profile picture, or something else.
Then this will need storage that if by any mistake the website got hacked, erased, or faulty bug cause storage to be erased then it must be backed up and properly separately stored. for that, we can use S3.
6. CloudFront (CDN)
Now that we have an S3 in place which can serve external assets like (JS files, CSS files, Media, ..etc) from S3. which will add nothing to the application.
The thing is though, when a user requests your page it will do another trip for each of those to get the files from your EC2 instance again. And even worse if your server is in a country and the user is requesting multiple times from a further country. for that, we need a CDN , and for that, we can use CloudFront in AWS.
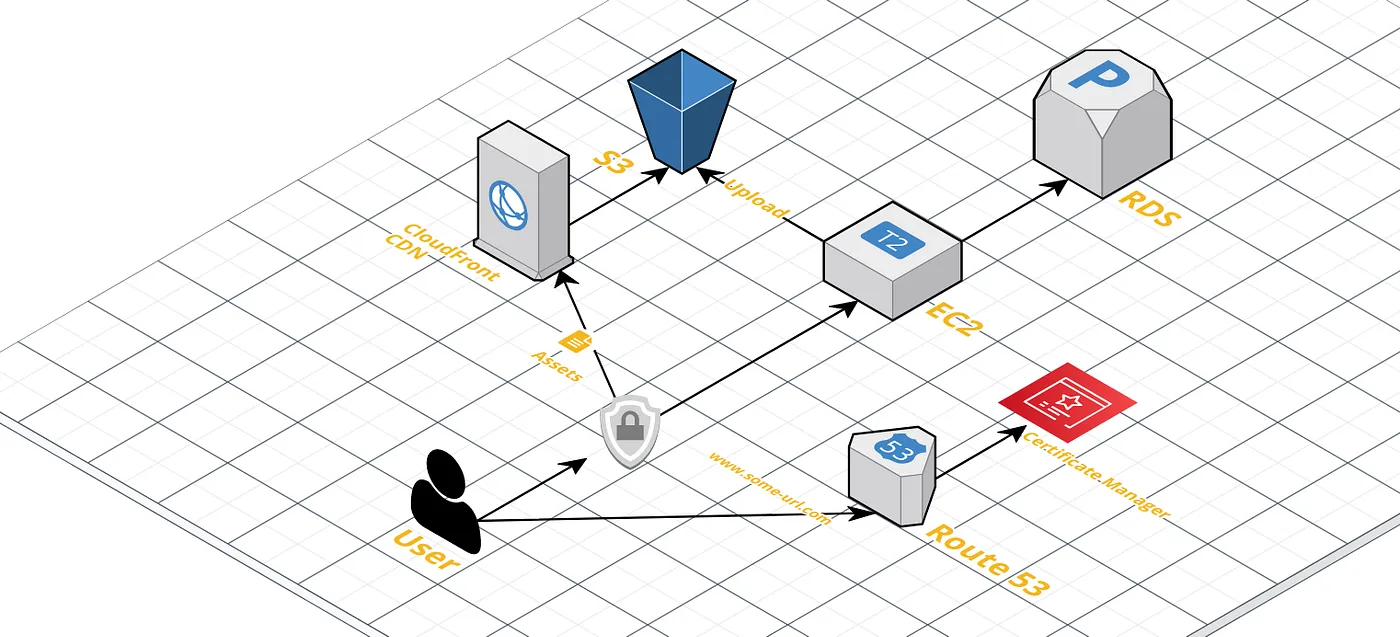
CDN will now serve cached assets from a very close asset server to the user requesting.
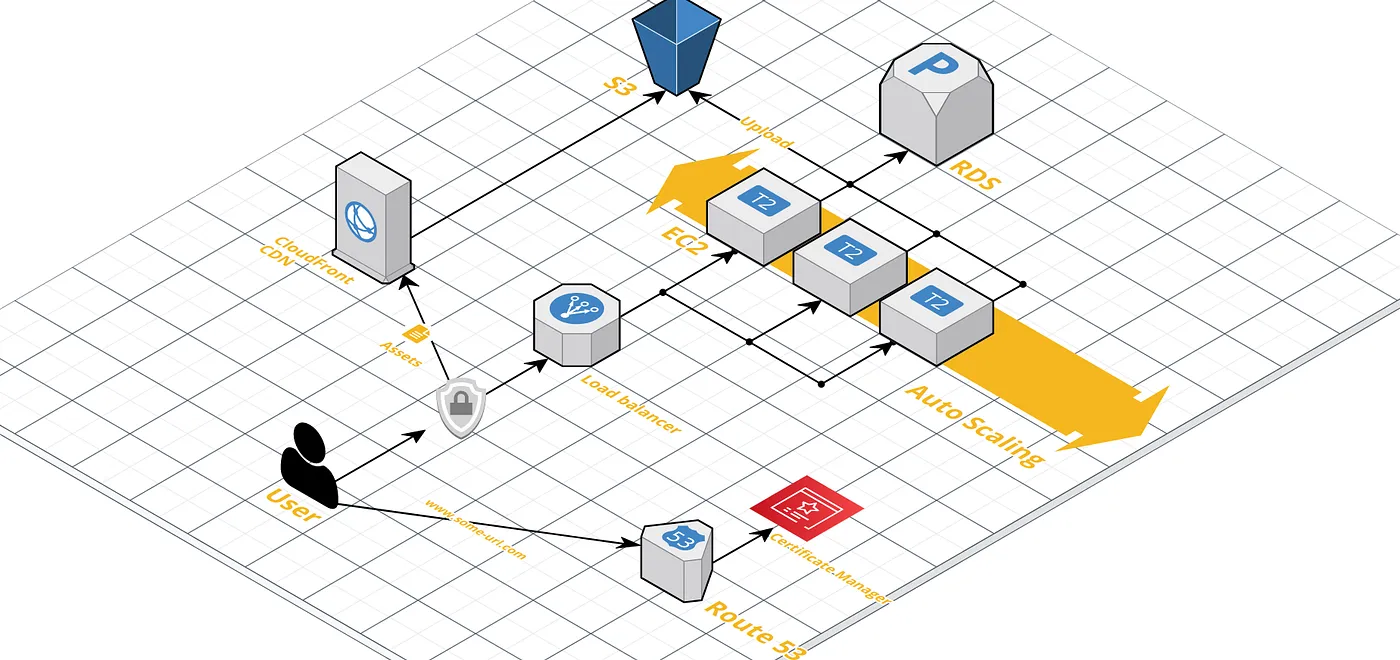
7. Load Balancer
Our application serves everything correctly now. but, what happens if we get a lot of users suddenly, or let’s say we’re predicting to get a lot of traffic after doing an ads campaign. In that case, we need to handle let’s say 3 times the traffic on our server which let’s say it’s using its max resources currently.
What should we do?
We can level up the instance to a better one M5 instance or anything that can handle 3 times the computing. but, we’d be missing out on the software limitation that at a certain point requests will be queued in 1 server and that can be solved by creating 3 servers instead of making 1 big instance. plus we can just terminate those if the traffic was gone at some point.
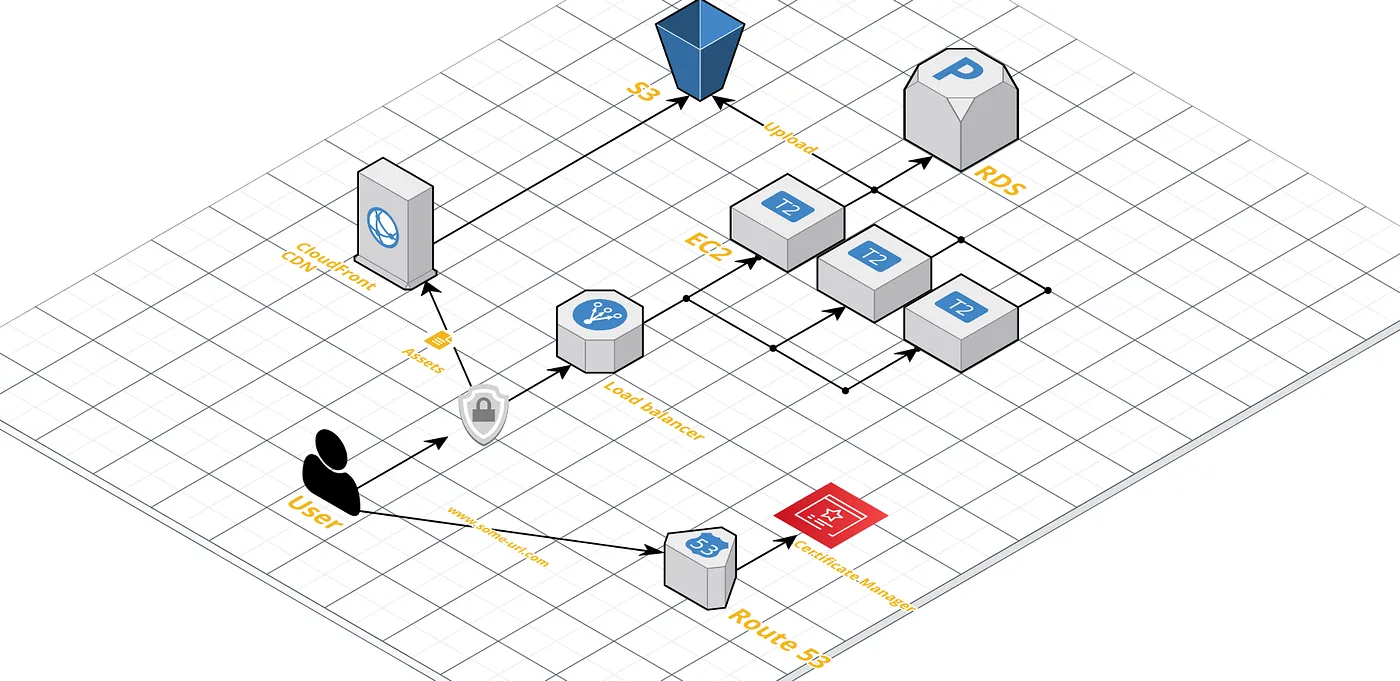
In order to achieve that, we need to replicate our server and deploy our code to 2 new servers. and then use a nice service distributor from AWS which is Elastic Load Balancer.
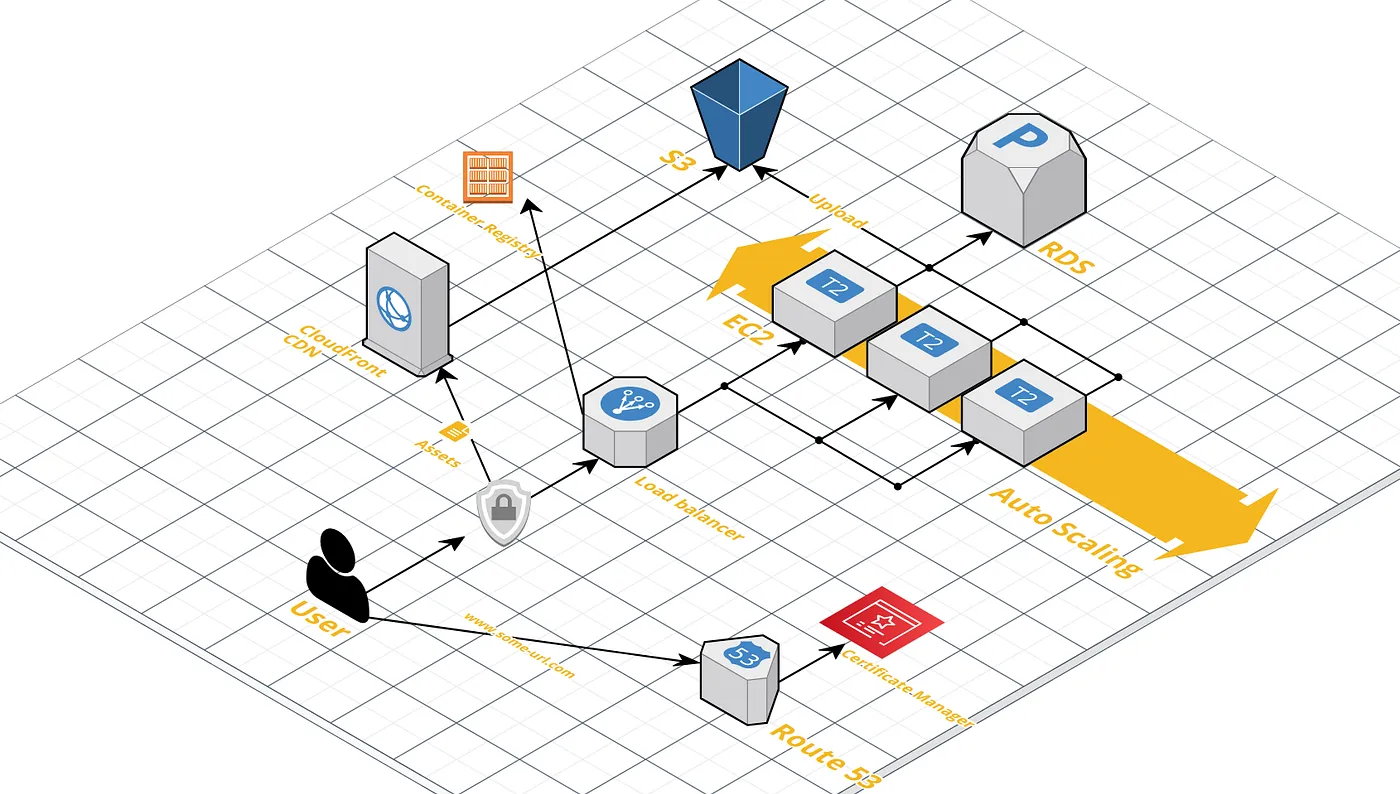
8. Elastic Load Balancing (Horizontal scaling)
Now that we’ve made our system adapt to new traffic, it becomes tedious to create and remove servers based on the needs. let along with the monitoring itself and forgetting this might cause extra cost and so on so forth.
For that, we can use ELB (Elastic Load Balancer) to scale our architecture horizontally. meaning, it will start up new servers on-demand and will remove them when the need is gone.
In order for the above setup to work smoothly you need to have something in place, that thing is:
Containerize Your Application
Have your services in the EC2 instance containerized using Docker.
Create a docker image for Nginx, PHP so that when the scaling happens all you need to do is to pass the docker-aws JSON file which will spawn up the server based on the images built and specified in the JSON file.
The JSON file will point mostly to a Docker container registry which will contain your built images of docker. For that, you can use Amazon Container Service.
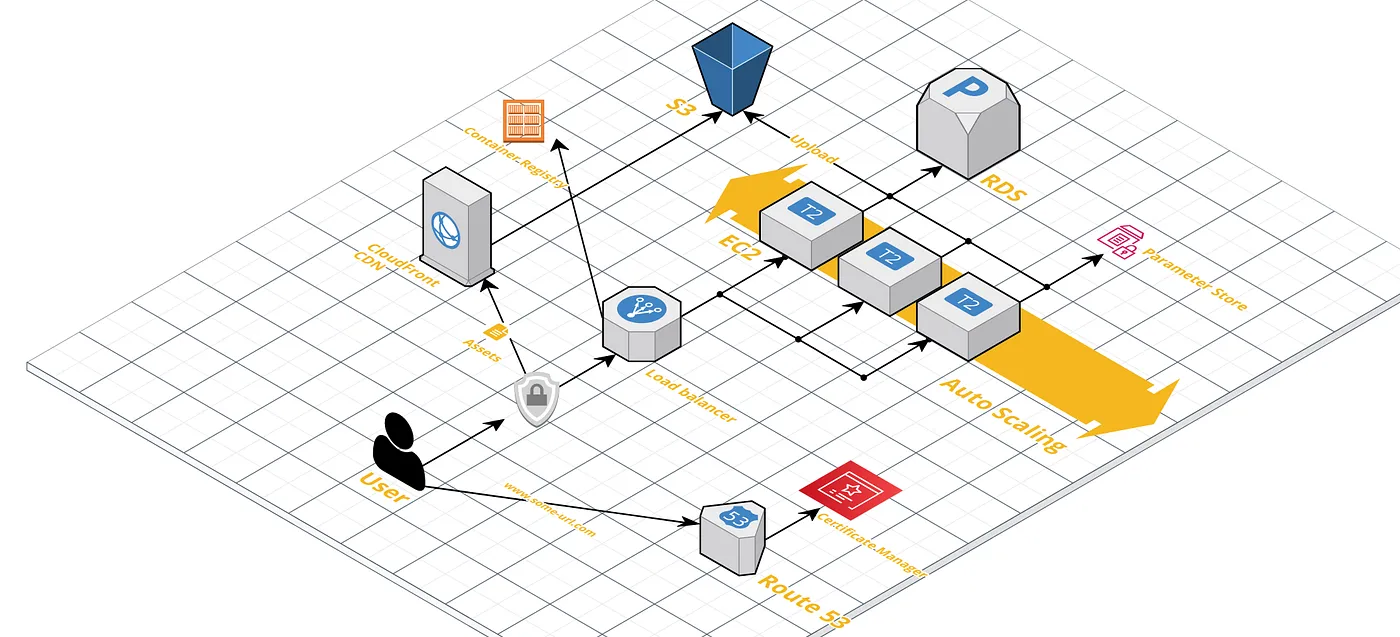
9. Parameter Store
Now that you have lots of resources you need a secure place where your server can use and store their credentials securely and not putting it in the codebase to avoid having them stolen and to make it easy to change credentials without having to redeploy your code. For this, we can use the Parameter Store, which is a service from AWS that enables key:value of credentials and stuff like that to be stored.
I’m going to conclude the article here, there will be a part2 which will cover securing servers with proper layers, adding proper security groups, extending to multiple regions. For that and other interesting stuff, make sure you follow me and I’ll make sure you have a great content to read ;)
 Youtube, Gmail, and other Google services are having problems